Orange-Cardamom Olive Oil Cake
Posted on: December 11, 2022. Updated on: July 6, 2023.
 by Carolina Gelen
This is one of my most popular recipes. I originally deveoped this recipe over a year ago as a resident at Food52 but decided the recipe could use a bit of a makeover. I redesigned it so it would fit a larger pan (as per your numerous requests), but also focused on technique and efficiency for this new upgrade. I heard all your questions and struggles with this recipe, so I’m here to make things so much easier for you.
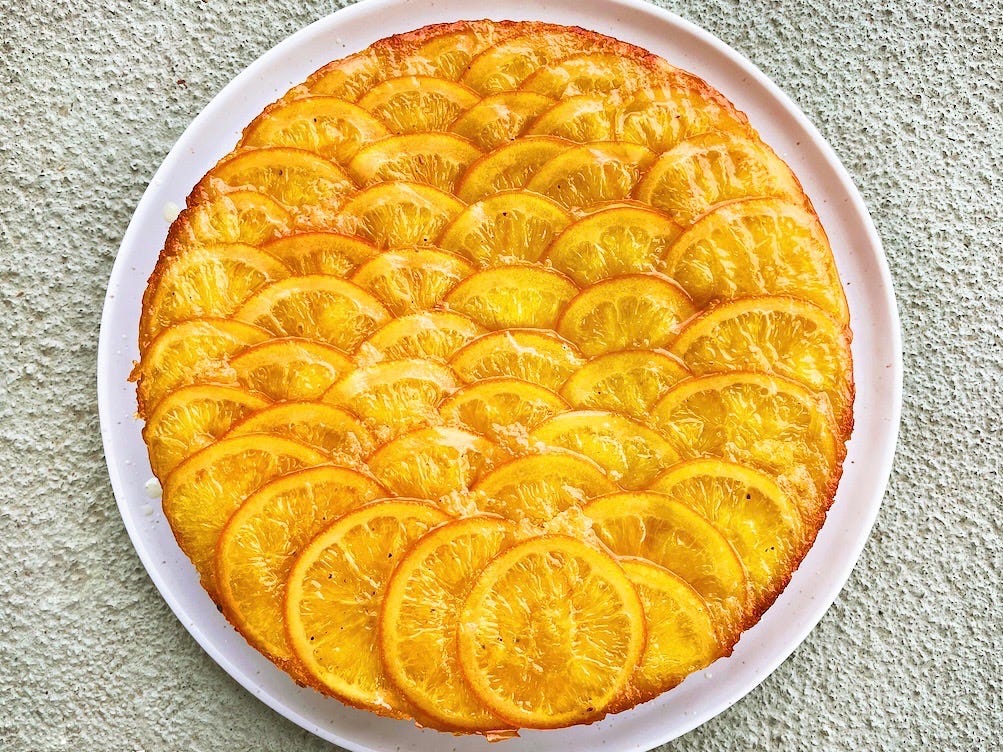
The orange cardamom olive oil cake is perfect for Hanukkah, the holidays or any day. It’s such a delicious, festive cake, yet it comes together so easily. This new recipe contains a few step by step guides to help you visualize the process a little better.
I like to serve this orange cardamom olive oil cake with a tiny drizzle of olive oil on top and some tangy yogurt or ice cream on the side. I look forward to seeing your version of this recipe!
- Wash the oranges under warm water, gently scrubbing them with a soft (non-abrasive) sponge.
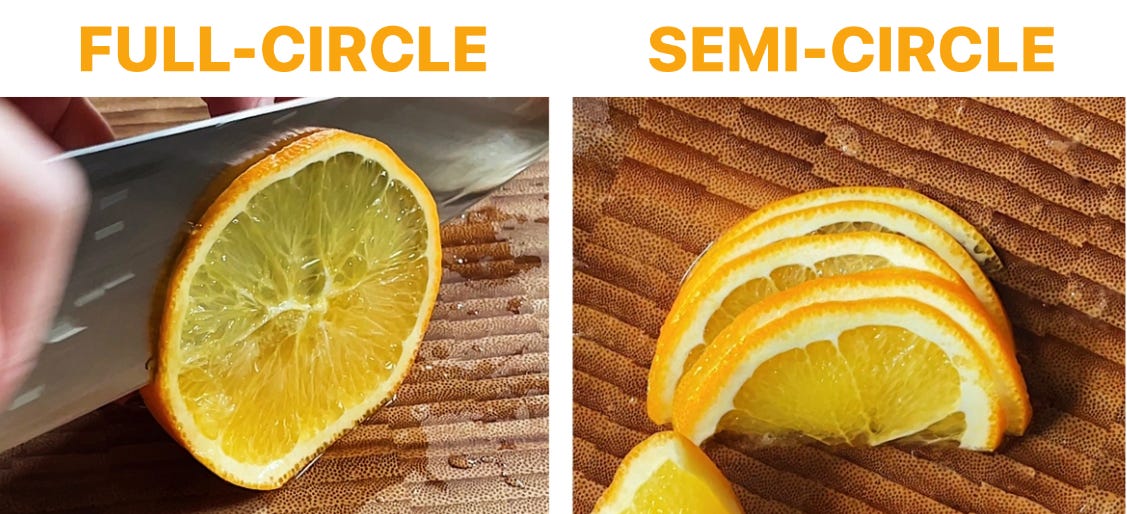
- The previous version of this recipe solely used full-circle orange slices for the upside down cake pattern, which can be hard to properly, and evenly slice. This new version is here to make things easier and more efficient: in total, we’ll need about 9 full-circle orange slices for the upside-down orange pattern, the rest of the slices will be semi-circles. Aim for 3 full-circle slices per orange.You’ll need 9 of these total, the rest of slices can be semi-circles.

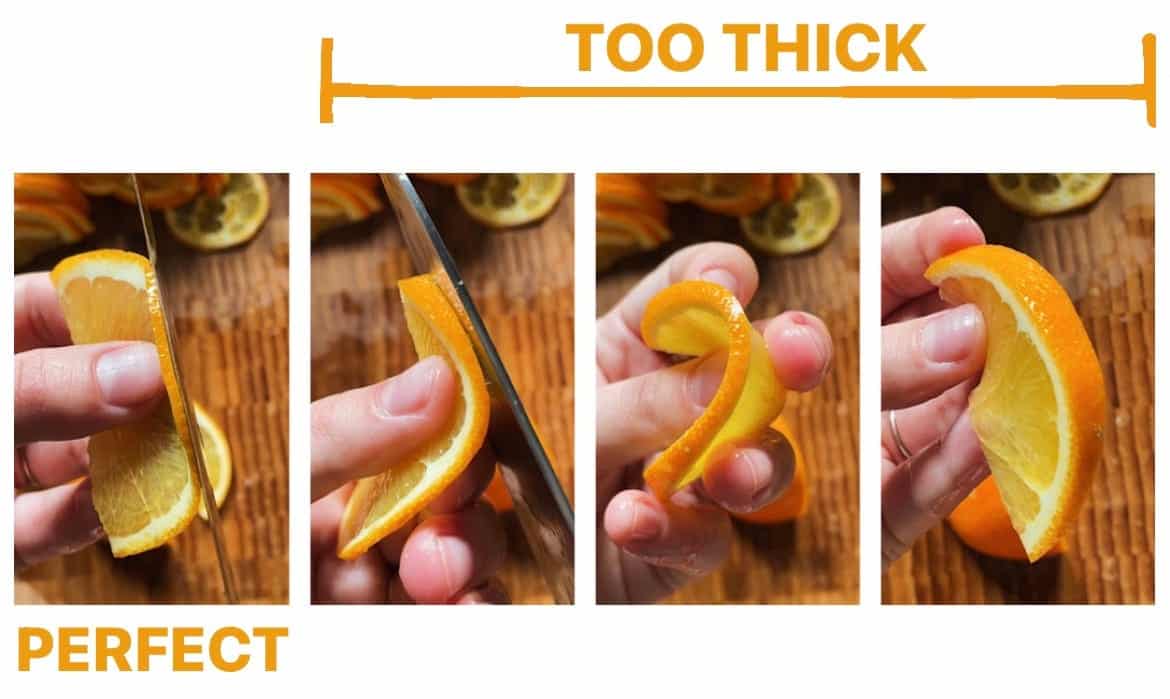
- Slice the top third off the orange and set it aside, we’ll use that for juicing later in the recipe. Cut the orange crosswise, into 3 to 4 mm (1/8 inch) thin slices. A sharp knife is key here! If you cut some thicker slices by mistake, save them for juicing later in the recipe, or for snacking. Once you’ve obtained your 3 full-circle slices per orange, move on to the following step:
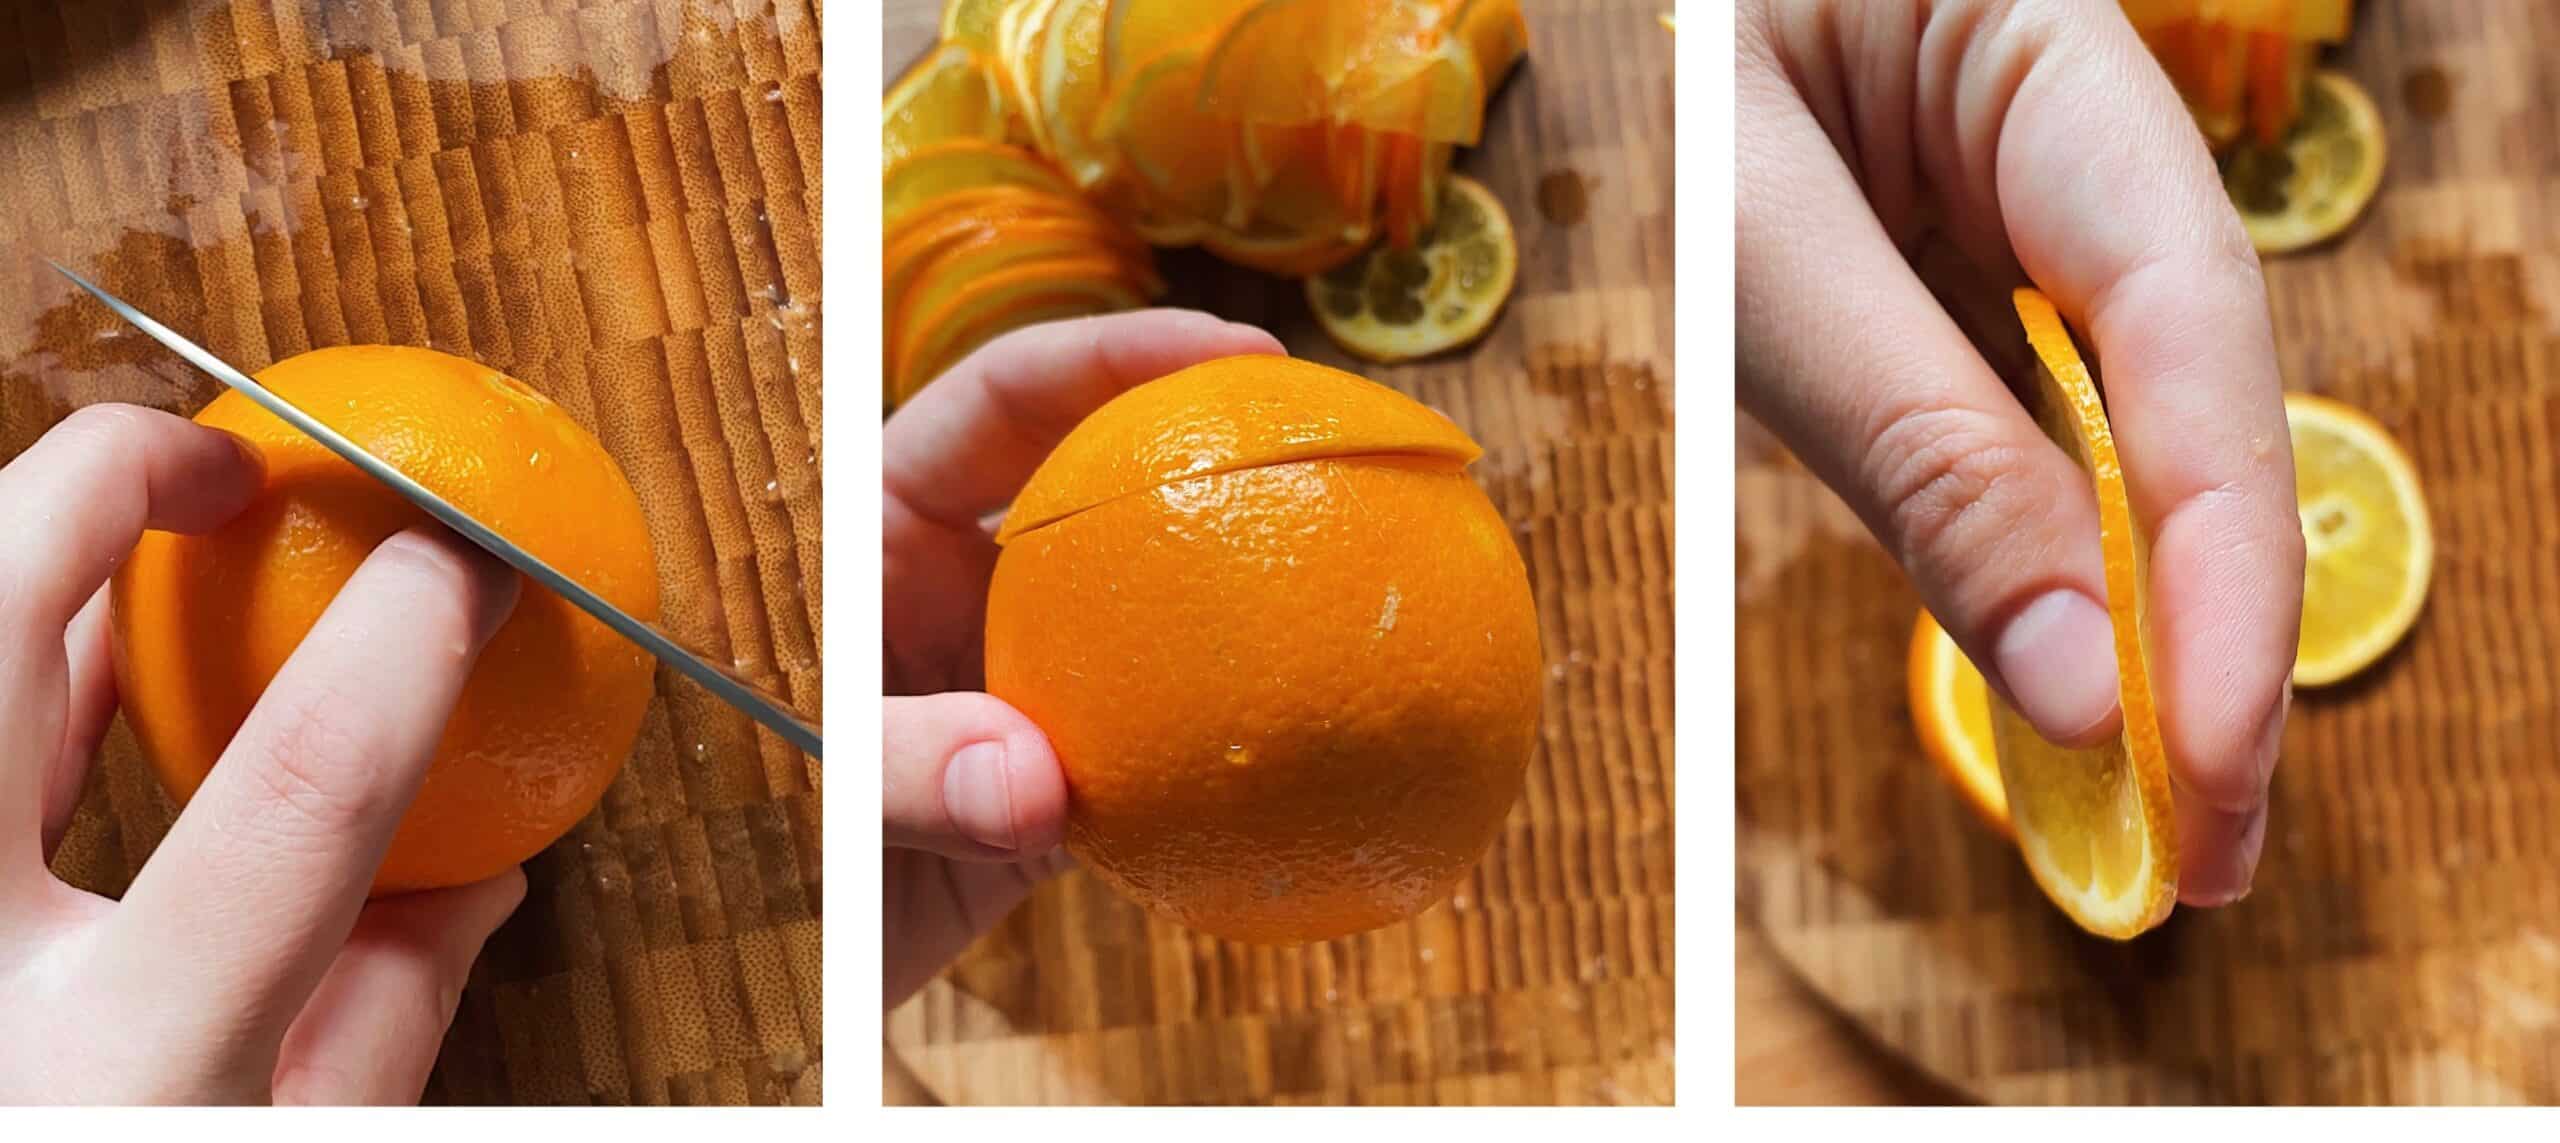

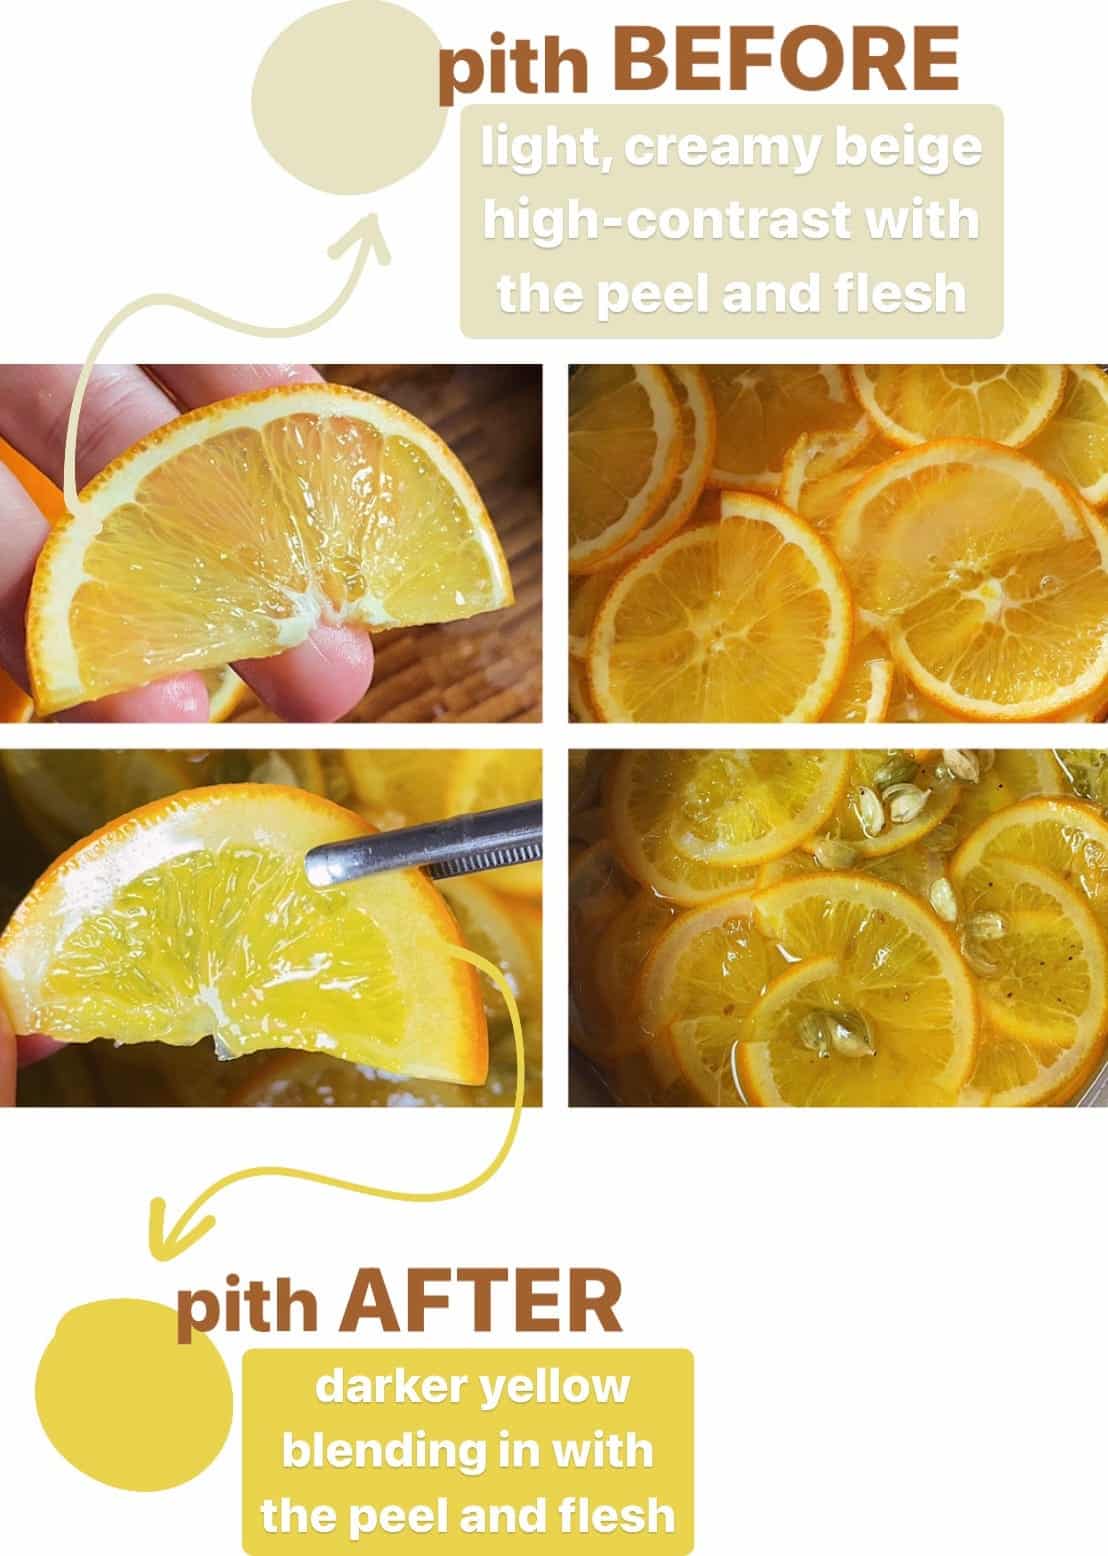
- Cut the remaining orange in half, and remove the pith from the middle.


- Slice the orange into 3 to 4 mm (1/8 inch) thin semi-circles. Save the remaining wedge at the end for snacking or juicing (the orange wedge at the end that can be tricky to slice into thin semi-circles, and that yields small slices).

- Make a cartouche (a parchment paper lid):
– tear a square/rectangle piece of parchment paper and fold it in half (image 1)
– keep folding in half, from tip to tip, until you’re left with a rough looking triangle (image 2)
– place the tip of the parchment triangle in the center of your saucepan and cut to the desired length (that matches the diameter of the pan) (image 3 and 4)
– cut a small chunk off the tip of the triangle (image 5)
– unfold the cartouche (image 6)How to make cartouche (parchment paper lid)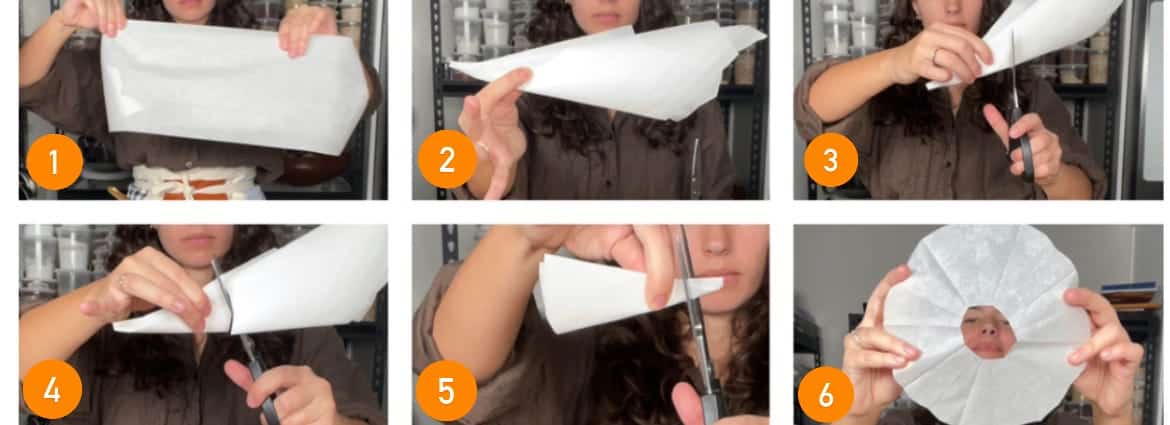

- In a saucepan on medium heat, combine 1 1/4 cups of sugar, 1 1/4 cups of water and 5 crushed cardamom pods or 1/2 teaspoon ground cardamom. Add the sliced oranges to the pan. Place the cartouche right on top of the oranges, this will keep them submerged in liquid while simmering. Once the mixture comes to a boil, turn the heat to medium-low, and simmer for 35 to 60 minutes. I’m not a fan of giving time estimates when it comes to this stuff, there are so many variables that influence the cooking time that we have no control of, your slices might be thicker than the ones I used, your medium-low might me my stove’s low, yadayadayada. Therefore, here’s a before and after example that will help you figure out if your oranges are done simmering:

While the orange slices are simmering, make the cake: - Heat the oven to 175°C or 350°F. 3. Brush a 25-cm or 10-inch round pan with oil (can be a springform pan). Line the bottom and the sides of the pan with parchment paper. A 9-inch square pan will also do the job.
- In a medium mixing bowl add 1 1/3 cups sugar, 2 tablespoons orange zest, and 12 finely crushed cardamom pods (2 teaspoons ground cardamom) and 1/2 teaspoon kosher salt. Rub the sugar, orange zest, and cardamom together using your fingers, until fragrant, and until the sugar becomes a light yellow color.
- Add 4 eggs to the bowl and vigorously whisk until light, fluffy and pale. Slowly stream 3/4 cup of olive oil in the egg mixture, while constantly whisking everything together.
- Once the olive oil has been incorporated, add 1 teaspoon vanilla extract, 1/4 cup orange juice (juice the scrappy leftover orange slices and wedges), 1/4 teaspoon baking soda and whisk to combine. In a separate bowl, whisk the 1/2 teaspoon baking powder and 1 3/4 cup of flour together. Sift them in the egg mixture, and gently fold the dry ingredients using a spatula until there are no more visible dry flour spots.
- Arrange all the syrupy orange slices on the bottom of the pan, while the process might seem tedious, it’s very easy and shouldn’t take you more than 12 to 15 minutes:
I know you’re tempted to arrange the orange slices into a circle, but that’s not the direction we’re aiming for: instead, build overlapping rows going from left to right
– start by building a vertical row on the left using the full-circle orange slices
– next, create another vertical row using the semi-circle orange slices, making sure the straight cut side (not the peel side) is overlapping the previous row of oranges (view image below)
– repeat the previous step until the bottom of the pan is fully covered in orange slices if an orange is too thin, overlay another orange slice on top arrange any remaining slices on the edge of the pan.
– P.S. that is not a hair in the middle of the parchment paper, it’a a weird fold 🙂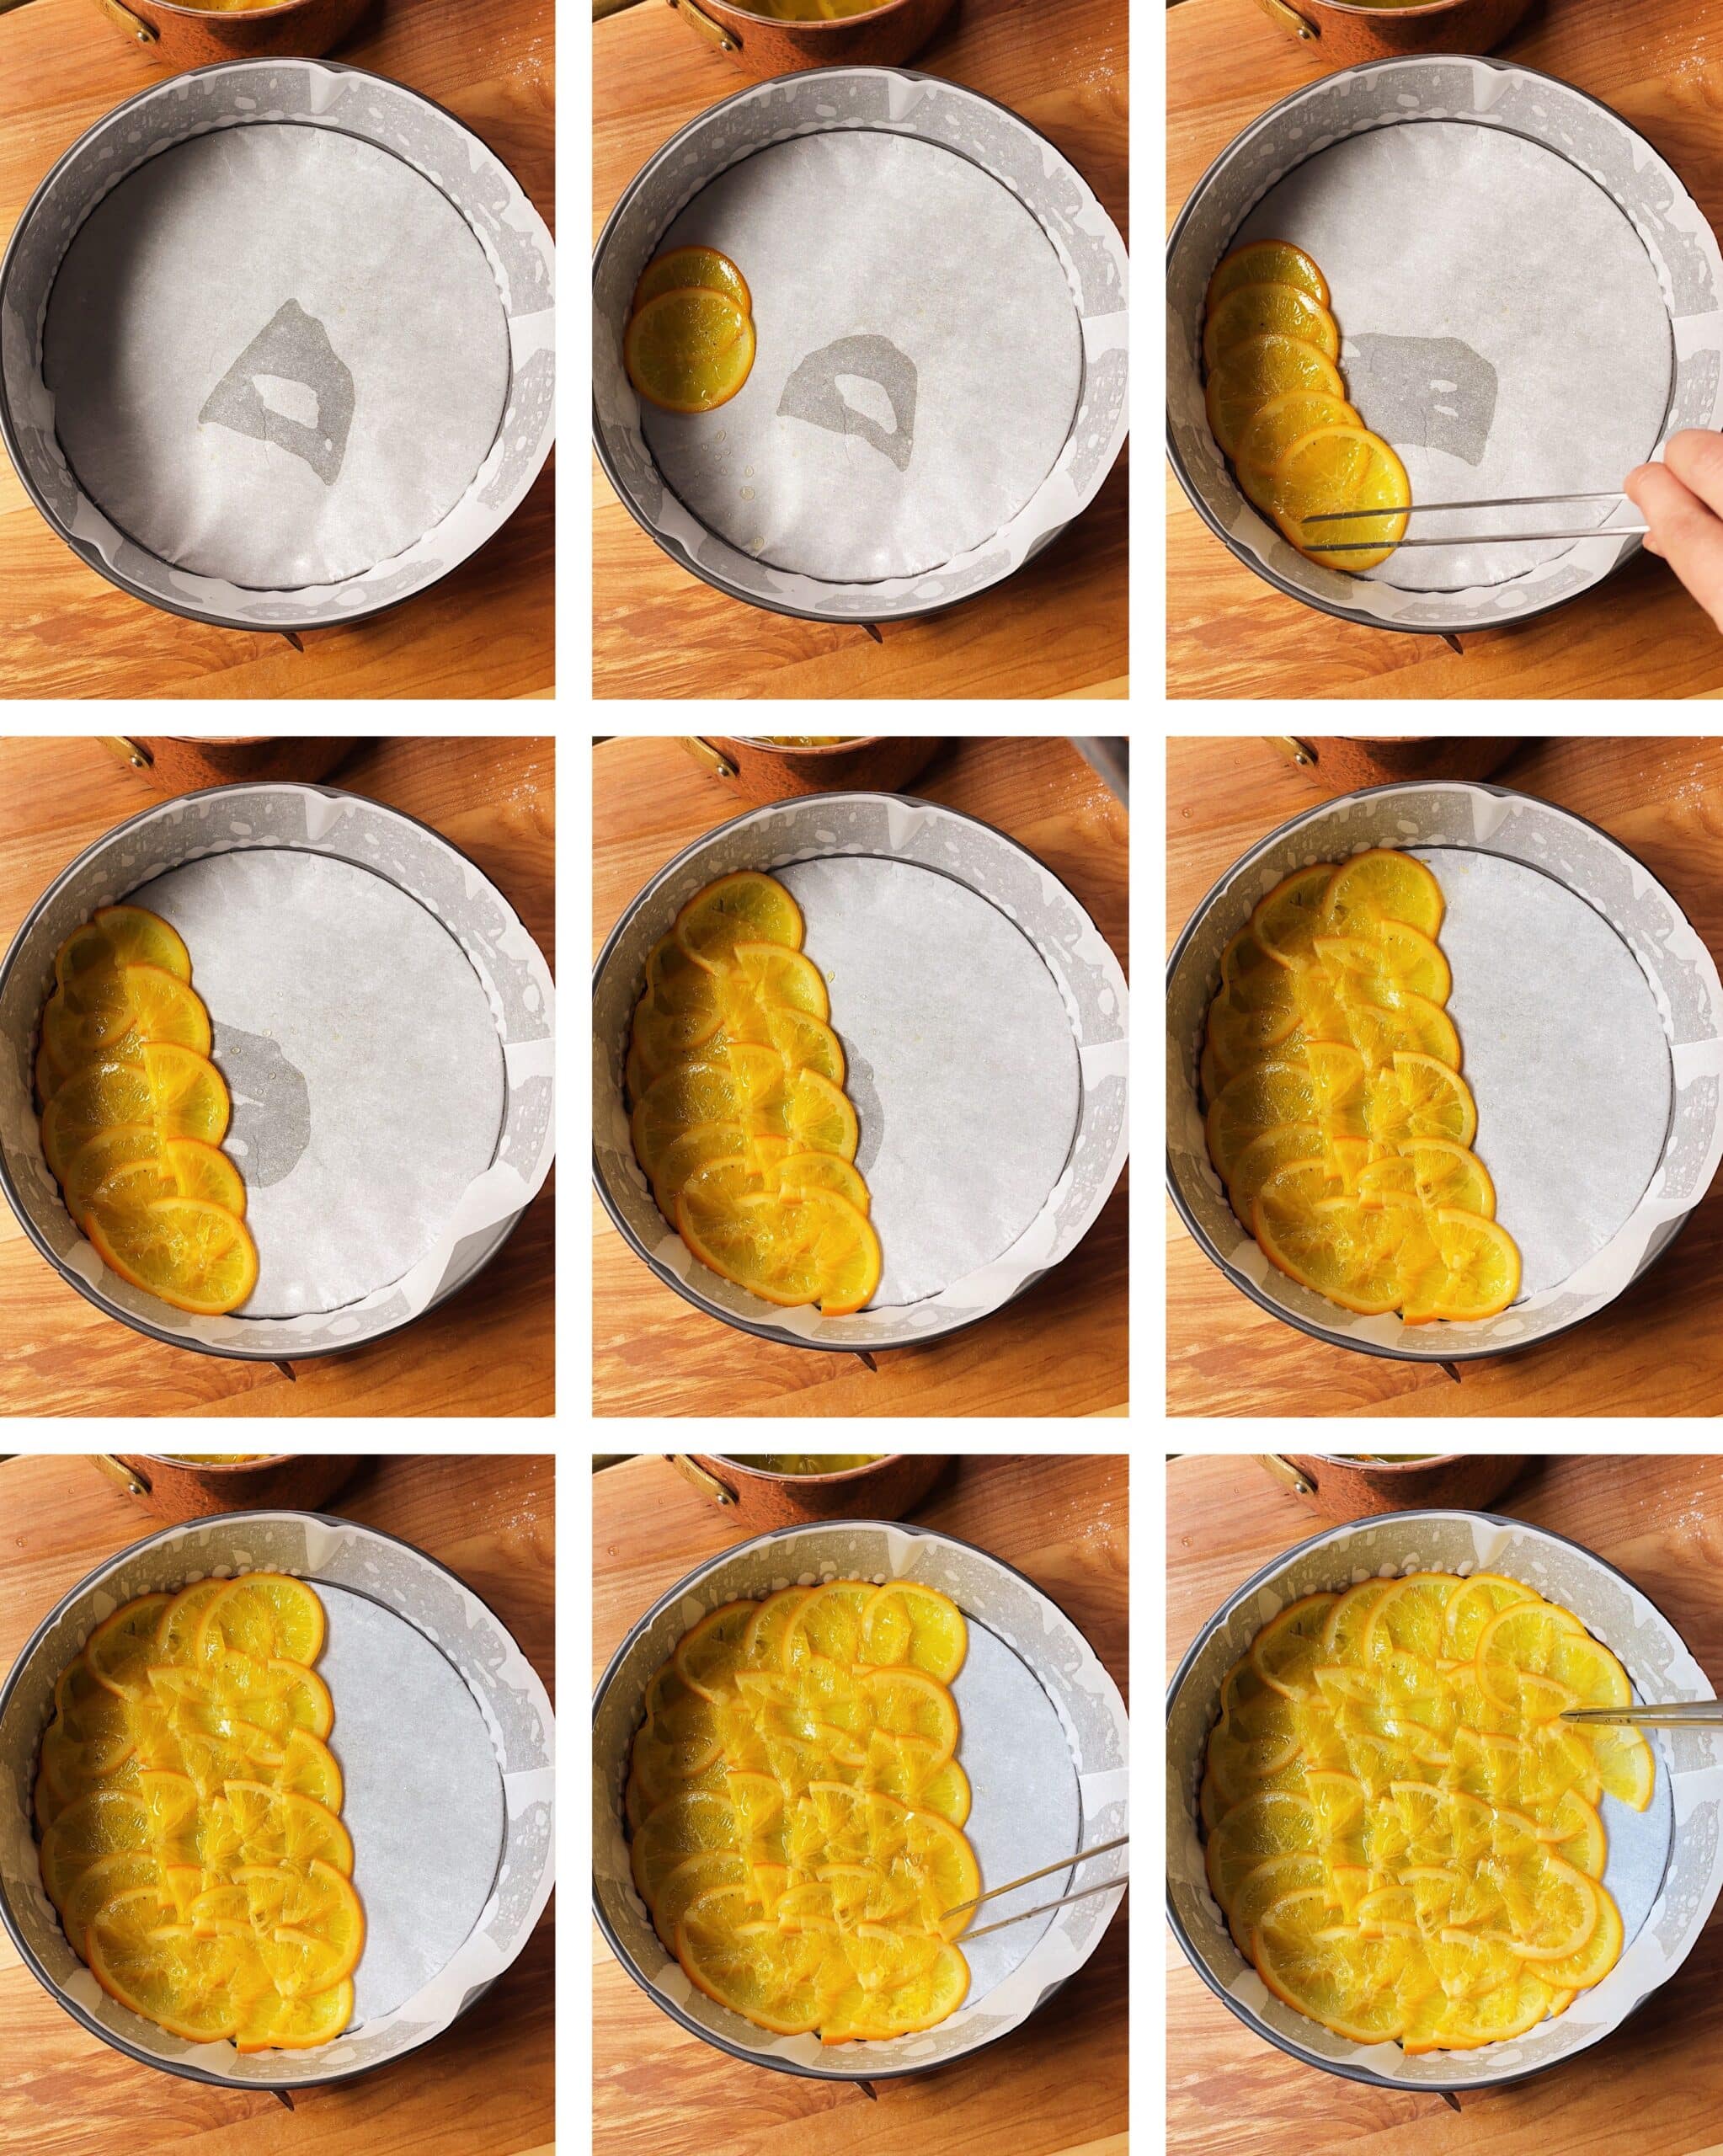

- Drizzle 1/8 cup of the leftover cardamom orange syrup (in which we cooked the oranges) over the orange layer at the bottom of the pan. Lightly drizzle with a glug of olive oil. Save the remaining cardamom orange syrup for later.
- Gently pour the cake batter in the pan, over the orange slices. Make sure you don’t skip this step: place the cake pan on another baking tray (lined with parchment paper). The second pan will catch any potential sugar syrup drops (if using a springform pan) and prevent the orange layer from overcooking and burning. Bake on the middle rack of your oven,
- Bake the cake for 60 to 75 minutes, checking on the cake halfway through baking. If the cake starts to brown too fast on top, cover with aluminum foil and continue baking. To check if the bake is cooked, gently tap the center of the cake in the oven. If it’s wobbly, almost fluid underneath, it’ll need more time. If it’s solid and springy, it’s ready to come out. All ovens are a little different, hence the roomy time interval.
- Cool off the cake for at least 10 minutes before taking it out of the baking pan. Place a large serving plate over the cake pan, then carefully flip the two. Gently lift up the pan and parchment paper to reveal the orange pattern. Brush some of the remaining orange cardamom syrup on top of the cake and it’s ready to be served.
Orange-Cardamom Olive Oil Cake
Servings: makes a 10-inch (25-cm) cake, serves about 10 to 12
Prep: 45min
Total: 1hr
Chill time: 10min
Ingredients
Candied Oranges
- 1 1/4 cups sugar
- 1 1/4 cups water
- 5 cardamom pods, crushed or 1/2 teaspoon ground cardamom
- 3 medium oranges
Cake
- 1 1/3 cups (266 g) granulated sugar
- 1/2 teaspoon kosher salt
- 2 tablespoons orange zest (about the zest of 2 oranges)
- 12 cardamom pods, freshly ground or 2 teaspoons ground cardamom
- 4 eggs
- 3/4 cup (150 g) extra-virgin olive oil
- 1 teaspoon vanilla extract
- 1/4 cup freshly squeezed orange juice (about the juice of a medium orange)
- 1/4 teaspoon baking soda
- 1 teaspoon baking powder
- 1 3/4 cups (250 g) all-purpose flour
Instructions
- Wash the oranges under warm water, gently scrubbing them with a soft (non-abrasive) sponge.
- The previous version of this recipe solely used full-circle orange slices for the upside down cake pattern, which can be hard to properly, and evenly slice. This new version is here to make things easier and more efficient: in total, we’ll need about 9 full-circle orange slices for the upside-down orange pattern, the rest of the slices will be semi-circles. Aim for 3 full-circle slices per orange.You’ll need 9 of these total, the rest of slices can be semi-circles.
- Slice the top third off the orange and set it aside, we’ll use that for juicing later in the recipe. Cut the orange crosswise, into 3 to 4 mm (1/8 inch) thin slices. A sharp knife is key here! If you cut some thicker slices by mistake, save them for juicing later in the recipe, or for snacking. Once you’ve obtained your 3 full-circle slices per orange, move on to the following step:
- Cut the remaining orange in half, and remove the pith from the middle.
- Slice the orange into 3 to 4 mm (1/8 inch) thin semi-circles. Save the remaining wedge at the end for snacking or juicing (the orange wedge at the end that can be tricky to slice into thin semi-circles, and that yields small slices).
- Make a cartouche (a parchment paper lid):
- – tear a square/rectangle piece of parchment paper and fold it in half (image 1)
– keep folding in half, from tip to tip, until you’re left with a rough looking triangle (image 2)
– place the tip of the parchment triangle in the center of your saucepan and cut to the desired length (that matches the diameter of the pan) (image 3 and 4)
– cut a small chunk off the tip of the triangle (image 5)
– unfold the cartouche (image 6)How to make cartouche (parchment paper lid) - In a saucepan on medium heat, combine 1 1/4 cups of sugar, 1 1/4 cups of water and 5 crushed cardamom pods or 1/2 teaspoon ground cardamom. Add the sliced oranges to the pan. Place the cartouche right on top of the oranges, this will keep them submerged in liquid while simmering. Once the mixture comes to a boil, turn the heat to medium-low, and simmer for 35 to 60 minutes. I’m not a fan of giving time estimates when it comes to this stuff, there are so many variables that influence the cooking time that we have no control of, your slices might be thicker than the ones I used, your medium-low might me my stove’s low, yadayadayada. Therefore, here’s a before and after example that will help you figure out if your oranges are done simmering:While the orange slices are simmering, make the cake:
- Heat the oven to 175°C or 350°F. 3. Brush a 25-cm or 10-inch round pan with oil (can be a springform pan). Line the bottom and the sides of the pan with parchment paper. A 9-inch square pan will also do the job.
- In a medium mixing bowl add 1 1/3 cups sugar, 2 tablespoons orange zest, and 12 finely crushed cardamom pods (2 teaspoons ground cardamom) and 1/2 teaspoon kosher salt. Rub the sugar, orange zest, and cardamom together using your fingers, until fragrant, and until the sugar becomes a light yellow color.
- Add 4 eggs to the bowl and vigorously whisk until light, fluffy and pale. Slowly stream 3/4 cup of olive oil in the egg mixture, while constantly whisking everything together.
- Once the olive oil has been incorporated, add 1 teaspoon vanilla extract, 1/4 cup orange juice (juice the scrappy leftover orange slices and wedges), 1/4 teaspoon baking soda and whisk to combine. In a separate bowl, whisk the 1/2 teaspoon baking powder and 1 3/4 cup of flour together. Sift them in the egg mixture, and gently fold the dry ingredients using a spatula until there are no more visible dry flour spots.
- Arrange all the syrupy orange slices on the bottom of the pan, while the process might seem tedious, it’s very easy and shouldn’t take you more than 12 to 15 minutes:
I know you’re tempted to arrange the orange slices into a circle, but that’s not the direction we’re aiming for: instead, build overlapping rows going from left to right
– start by building a vertical row on the left using the full-circle orange slices
– next, create another vertical row using the semi-circle orange slices, making sure the straight cut side (not the peel side) is overlapping the previous row of oranges (view image below)
– repeat the previous step until the bottom of the pan is fully covered in orange slices
– if an orange is too thin, overlay another orange slice on top
– arrange any remaining slices on the edge of the pan.
– P.S. that is not a hair in the middle of the parchment paper, it’a a weird fold 🙂 - Drizzle 1/8 cup of the leftover cardamom orange syrup (in which we cooked the oranges) over the orange layer at the bottom of the pan. Lightly drizzle with a glug of olive oil. Save the remaining cardamom orange syrup for later.
- Gently pour the cake batter in the pan, over the orange slices. Make sure you don’t skip this step: place the cake pan on another baking tray (lined with parchment paper). The second pan will catch any potential sugar syrup drops (if using a springform pan) and prevent the orange layer from overcooking and burning. Bake on the middle rack of your oven,
- Bake the cake for 60 to 75 minutes, checking on the cake halfway through baking. If the cake starts to brown too fast on top, cover with aluminum foil and continue baking. To check if the bake is cooked, gently tap the center of the cake in the oven. If it’s wobbly, almost fluid underneath, it’ll need more time. If it’s solid and springy, it’s ready to come out. All ovens are a little different, hence the roomy time interval.
- Cool off the cake for at least 10 minutes before taking it out of the baking pan. Place a large serving plate over the cake pan, then carefully flip the two. Gently lift up the pan and parchment paper to reveal the orange pattern. Brush some of the remaining orange cardamom syrup on top of the cake and it’s ready to be served.
The cake is so pretty and it seemed something I could accomplish so I made it for a Christmas dessert. It was fun to make and was a hit at dinner. I used the leftover syrup with pancakes. 😋
The most difficult/time-consuming part of this recipe is cutting the orange slices — other than that, it’s super easy!! All you need is a sharp knife and you are rewarded with a stunner of a cake! My partner and I have made it twice now, with rave reviews from friends and family both times ☺️
This was one of the best desserts I have baked. Pretty, delicious and everyone loved it. Leftover orangy syrup was used in orange cocktails 🍹Came here to make it second time ❤️
Natia,
I am so glad it was a success! Love the idea of orange cocktails 🙂
This is the most beautiful cake and amazing taste & texture BUT I can never get the oranges right. The results after baking are not really the same as yours. I have made this cake twice; the second time with blood oranges… the oranges are cooked alright – at least to my taste – but they were kinda buried-ish 😔 I have a similar upside down orange cake recipe that uses simple caramel (sugar + water) on the baking pan and oranges next that works better for me. Please tell me what can I do 😩 I don’t really like the caramel version 😞 All the explanation was to give a background, your work is impeccable, even if I wanted to I would never be able to find a single flaw 😅
You’re so sweet!!! I hear you!!! My biggest suggestion when it comes to getting that orange topping right is to make sure you overlap the oranges as much as possible to prevent the batter from seeping through that orange pattern. All the batter needs is a tiny space in between the oranges to seep in the bottom of the pan.
One more thing, make sure they are thinly sliced, I find that when the oranges are on the thicker side, they are significantly more difficult to overlap, whereas if they are thin, they melt into each other as they’re baking, forming an even and compact layer on the bottom of the cake 🙂
Keep me posted!!! I’m here if you need me xx